In penetration testing, it’s crucial to have various ways to interact with network services. While TCP (Transmission Control Protocol) is commonly used, UDP (User Datagram Protocol) is often leveraged for its speed and simplicity. UDP doesn’t guarantee delivery or order of packets, which can make it useful for testing scenarios where reliability isn’t a critical factor, such as network discovery or stress testing. In this blog post, we’ll walk you through creating a simple UDP client and server in Python, which will help you when working with UDP-based services.
Building a Simple UDP Server in Python
Why a UDP Server?
A UDP server listens for incoming data from clients. It can handle requests such as sending status messages, performing quick lookups, or responding with data based on the client’s message. Since UDP doesn’t establish a connection, the server simply waits for data and processes it when received.
In this section, we’ll build a simple UDP server in Python that listens for incoming data and sends a response back to the client.
UDP Server Code
import socket

IP = '0.0.0.0'  # Listen on all available interfaces
PORT = 9997

def main():
    # Create a UDP socket
    server = socket.socket(socket.AF_INET, socket.SOCK_DGRAM)

    # Bind the server to the specified IP and port
    server.bind((IP, PORT))
    print(f'[*] Listening on {IP}:{PORT}')

    while True:
        # Receive data from a client
        data, addr = server.recvfrom(4096)
        print(f'[*] Received data from {addr}: {data.decode()}')

        # Send a response back to the client
        server.sendto(b'ACK', addr)

if __name__ == '__main__':
    main()
Explanation
- Line 6: The server listens on all available network interfaces using
0.0.0.0. - Line 9: We create a UDP socket using
socket.AF_INETfor IPv4 andsocket.SOCK_DGRAMfor UDP. - Line 12: The
bind()method binds the socket to the specified address and port, allowing the server to listen for incoming data. - Line 15: Inside an infinite loop, the server waits for incoming data using
recvfrom(), which also returns the address of the client. - Line 18: After receiving data, the server sends a response (
b'ACK') back to the client.
You can find the full UDP Server code here: Insert Link
Building a Simple UDP Client in Python
Why a UDP Client?
A UDP client sends data to a target without establishing a connection or confirming the delivery, making it faster than TCP. This type of client is useful when you need to quickly send data to a service or simulate network traffic without waiting for acknowledgments.
Here’s a simple Python UDP client that sends a message to a server and prints the server’s response.
UDP Client Code
import socket

target_host = "127.0.0.1"
target_port = 9997

# Create a UDP socket
client = socket.socket(socket.AF_INET, socket.SOCK_DGRAM)

# Send some data
client.sendto(b"AAABBBCCC", (target_host, target_port))

# Receive response from the server
data, addr = client.recvfrom(4096)

# Print the response
print(data.decode())

# Close the connection
client.close()
Explanation
- Line 4: We specify the target host and port for the server. In this case, we use
127.0.0.1(localhost) and port9997. - Line 7: The
socket.socket()method creates a UDP socket usingsocket.AF_INET(IPv4) andsocket.SOCK_DGRAM(UDP). - Line 10: We use the
sendto()method to send the message"AAABBBCCC"to the server. - Line 13: The
recvfrom()method waits for a response from the server and stores the data and address. - Line 16: The response is printed, decoded to convert the byte string to text.
- Line 19: Finally, the client closes the socket connection.
You can find the full UDP Client code here: Insert Link
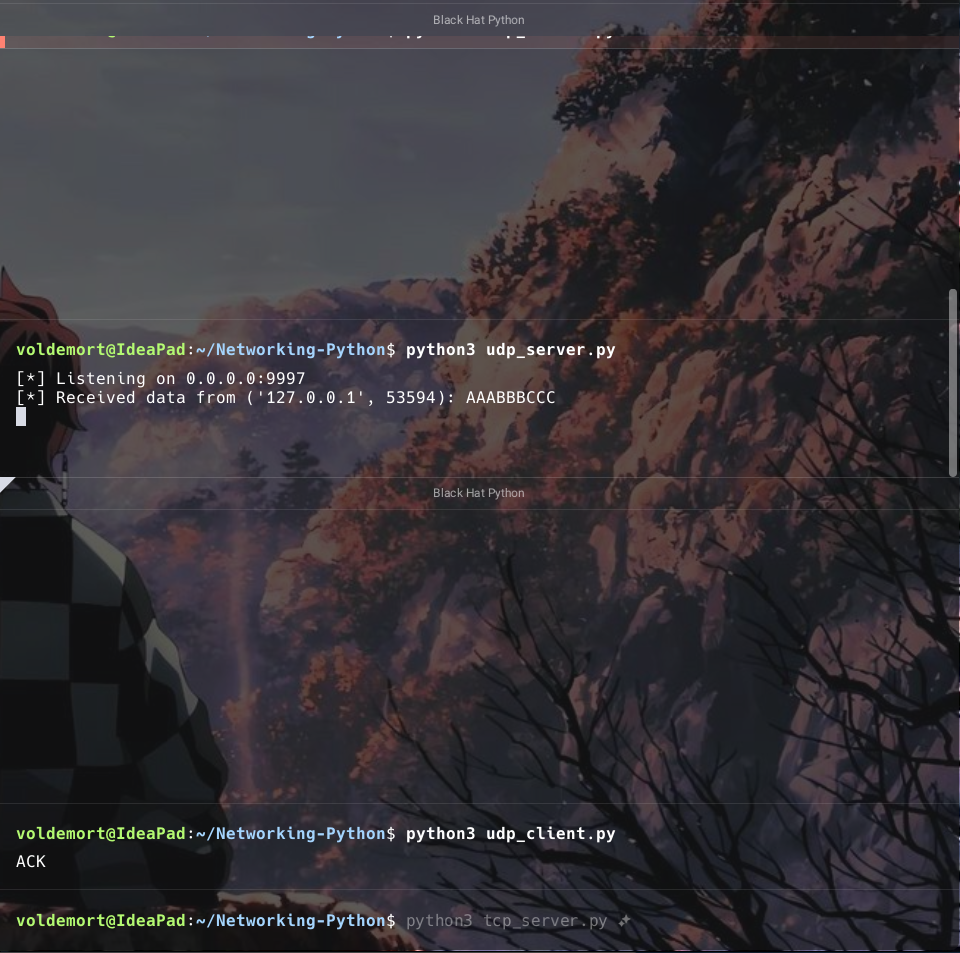
Testing the UDP Client and Server
To test the UDP server and client, run the server script first, followed by the client script. You should see the following :